WiFi repeater
When camping near to a hotspot, we like to avoid using our shared cellular data, especially when uploading lots of photos to this blog, upgrading software, or streaming video. And when in Canada we only use WiFi. The trouble is that the signal inside the van is often too weak at campgrounds or when parked in someone’s driveway. To solve this I installed a Ubiquity NanoStation M2 together with a Ubiquity AirGateway-LR access point. This very sensitive repeater setup can pick up a distant WiFi signal and make from it a new local hotspot inside and outside (near the van) for all our devices. The whole project cost under $150 and a day’s work. It requires 110 VAC so if you don’t have an inverter you can use it only when plugged in. Here I describe the installation in detail so you can duplicate it.
The NanoStation is an outdoor directional antenna together with the “radio” needed to provide a digital ethernet signal for the internet connection. I have mounted it on a mast above the van in a way that it can be easily rotated towards the WiFi source. The airGateway goes inside the van and acts as an access point to provide WiFi as WAN, so all of our devices (computer, iPhones, and iPads) can simultaneously connect to our internal WiFi hotspot that is getting its data from the remote WiFi hotspot. The local signal is strong enough to reach 20 or 30 feet outside the van. The mast is 11 feet high at the low position and can be raised another 6 feet to 17 feet high, so it looks over the top of other RVs in a campground.
DISCLAIMER: This equipment was designed for installation by professionals who are knowledgeable about meeting the FCC regulations for use of public frequencies and limiting the power output. If you do cause interference and get caught with an improper installation, you will be asked to stop using the equipment and may receive a fine. The author of these instructions assumes no liability for your installation. Having said this, I do not think you will have any problems. If I run into any problems with this setup I will post them here. If you are not comfortable with this aspect or if you are not good with advanced computer configurations as described below, then this system is probably not for you. I have no affiliation with Ubiquity or Amazon.
You might want to configure the equipment to make sure it works for you before constructing the mast. Note that you will need a laptop (or desktop) computer with a wired ethernet port for setup, but not for future operation.
The mast is made from Schedule 40 PVC water pipe available at all home center stores. Below is a list of materials. We found these pipe sizes are strong enough but you may want to move up to one size larger pipe so it does not move in the wind when raised. Note that the smaller diameter pipe needs to fit somewhat loosely inside the larger one.
The lengths specified are sufficient in the low position to keep the NanoStation above the air conditioner on our high-roof Sprinter. This increases our height from 10′ to 11′. We keep a note of our clearance needed on our dash in both feet and meters so we do not have to remember when passing under a low bridge. You could make it lower if you do not want to extend the height of your vehicle, but then you may need to raise it every time you use it. WiFi works best with line of sight to the source. The higher it is, the better signal you will get, but also the more wind resistance when driving.
- Ubiquity NanoStation M2
- Ubiquity AirGateway
- 82″ length of nominal 1″ pipe
- 23″ length of nominal 1″ pipe
- 78″ length of nominal 1.25″ pipe
- 22″ length of nominal 1.25″ pipe
- Cap for 1.25″ pipe
- Tee for 1″ pipe with a half-inch side opening
- (4) stainless hose clamps for 1.25″ pipe
- (1) stainless hose clamp for 1″ pipe (to tie onto a ladder if you have one)
- (1) stainless hose clamp for 2.5″ pipe (to tie onto a ladder if you have one)
- 1″ diameter wood block with a V groove cut for cable, or a half-inch square block should work
- 25′ or longer shielded outdoor CAT-5/6 ethernet cable with standard connectors on the ends
- A short shielded CAT-5/6 ethernet cable
- A laptop (or desktop) computer with an ethernet port
- Flat-head 0.5″ screw
- PVC cement (optional) or several 1/2″ screws
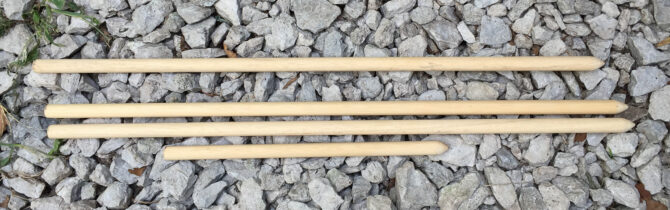
- (3) 20″ length of 0.5″ wood dowel
- (1) 10″ length of 0.5″ wood dowel
- 4″ heavy gauge wire or flat metal strap
Saw the pipes to length. Clean up any burrs on the ends with sandpaper. You can assemble the fittings with clear PVC cement or, if you want the option of disassembly for changing pipe lengths or whatever, you can drill then use one 1/2″ screw in each joint instead of cement. Note that the Tee on the top of the long 1″ pipe holds this pipe at the top of the long 1.25″ pipe and allows it to freely rotate. The top two short sections of pipe should not move with respect to each other and need to be screwed together (they are not tight enough for the cement to stick).
Attach the NanoStation to the top with two hose clamps. To feed the cable through the pipe you may want to first thread a piece of string through the pipes with a small weight tied onto the end. Then pull the cable through starting at the Tee and connect to the bottom of the NanoStation after removing the port cover. It might be a good idea to fill the Tee with caulk.
Make a hook out of the piece of heavy wire and strap near the bottom as shown. Drill and screw the small block of wood up an inch inside the bottom of the long 1″ pipe. The screw must be flat-head and countersunk so it does not prevent this pipe from sliding up inside the larger pipe. Make sure the V-groove for the cable is large enough so the cable can freely slide past the wood block and rotate.
Now you can mount the mast to your vehicle. I mounted on our ladder with pipe clamps as shown. If you do not have a ladder, I recommend one as a great way to mount your mast. The ladder is also very useful if you need to work on the top of your RV, and they are great for getting a high view position for taking photos. We purchased this stainless steel ladder from Amazon and it is high quality and attaches with only two screws into your vehicle. It is important that the mast is vertical, both for looks and so the antenna does not aim up into the sky or down into the ground.
I recommend placing the mast on the rear of the vehicle rather than a side to minimize wind resistance when driving. If you don’t have a ladder, you will probably need stand-offs to make the mast vertical. I found these products at McMaster Carr:
Assemble as shown in the photo. You will need to cut the stainless threaded rod and the U-bolts to length and add nuts to the threaded rod. Paint the mounting plate and use caulk or rubber gasket behind it when mounting to the vehicle. You could use a small length of pipe or hose to cover the threaded rod to improve the looks.
Saw the dowels to length. I used a power sander to make a point on one end and used a large drill bit to make an indentation in the other end. This way they will not slide apart as you raise the mast. With 70 inches of dowel total we have about 8 inches of overlap at the top when fully extended. By using fewer dowels you can make other heights if needed to avoid tree branches. I open the door before raising the mast to have more room to insert the dowels.
Next you need to route the cable into your RV. Raise the mast all the way to see how much cable you need to have available. I just routed the cable under the rear door since it is unlikely to ever leak around the wire, but you could also drill a hole through the side or bottom of your vehicle. I chose to store the extra cable when the mast is down inside the door as shown with two hooks and two cable clamps. You could also tie the extra cable length to the bottom of the ladder. Note that this is a digital cable not an antenna cable so it is ok to make sharp bends as long as you don’t break the insulation. Make sure that you have enough slack to open and close the door when the mast is either up or down and that the cable does not get caught in the door jamb. If it turns out that your cable is not long enough, you can purchase a shielded connector and another shielded Cat-5 or 6 cable. This cable does not need to be outdoor rated but must be shielded.
You should set up the electronics with your laptop computer before mounting the airGateway inside your RV. The NanoStation is commercial-grade equipment (called Consumer Premises Equipment or CPE) and does not have a user-friendly interface and instruction manual. However, you should quickly succeed in setting it up by following my instructions. Do not change any settings that are not included in these instructions and make sure the screens look like those in the screenshots below before saving. You may want to print this page or view on another device because you will not have internet on your laptop when changing these settings. If you have any trouble or something is not right with the instructions, be sure to comment on this page and I will reply soon.
- The NanoStation M2 comes with a POE (Power over Ethernet) injector module that will later connect to the airGateway. For now you will connect the POE to the NanoStation and to your laptop computer. You are not using the airGateway yet. Connect the shielded cable from the NanoStation to the POE port on the injector.
- Using another short shielded ethernet CAT-5/6 cable connect the LAN port on the injector to the ethernet port on your laptop computer. NEVER connect the computer to the POE port because the power on the cable might damage your computer.
- Plug the POE injector into a grounded 110 VAC power outlet.
- Set your laptop temporarily to a fixed internet address on the 192.168.1.x subnet. On a windows computer, go to the control panel, network and sharing center, change adapter settings. On this page, disable WiFi so it won’t connect while you are setting up the NanoStation . Then open the local area connection, click on properties for Internet Protocol Version 4 (TCP/IPv4). Set the fixed IP address to 192.168.1.10, subnet mask to 255.255.255.0, gateway to 192.168.1.1, and DNS to 192.168.1.1. If you have a MAC, turn off WiFi using the wireless icon in the upper menu bar. Then go to System Preferences, Network, Ethernet Self-Assigned IP, set Configure IPv4 to Manually then change the IP as above.
- Open your web browser (I use Chrome but any browser should work) and in the address bar at the top enter the web address as an IP to https://192.168.1.20 and press enter (PC) or return (MAC). Note that you are not on the internet at this point so other pages won’t work. You may get a safety warning page which you can safely bypass since you are just talking to the NanoStation .
- You should then see the NanoStation setup web page. Log in with username ubnt, password ubnt. Select the country and language and check the box that you agree with the terms of use, then click Login.
- On the Network tab set Network Mode to Router, NAT to enable, and below under Lan Network Settings, change IP address to 192.168.2.1, DHCP server to enabled, Range Start to 192.168.2.2 and Range End to 192.168.2.254. Compare this page to the screen-shot below, then click on Change at the bottom.
- On the System tab, change the username (optional) and password (recommended). Click on the key icon after the Administrator Username, enter the current password (ubnt), then choose a new password and enter it twice. Then click on Change in the lower right and (important!) click on Apply in the upper right. This will reboot the NanoStation and you will lose connection to it. Write down your username and password.
- Remove the static IP address from your laptop and go back to DHCP. Again on a PC go to TCP/IPv4 properties as in step 4 and select: Obtain an IP address automatically and Obtain DNS server address automatically.
- Enable wireless WiFi on the laptop that you disabled in step 4 above. The remainder of these instructions could be performed with a smartphone or tablet instead of a laptop.
- Next you will set up the airGateway as a router to provide a local WiFi hotspot access point for all your devices. First remove the power cord and the two ethernet cables from the injector.
- Snap together the airGateway and the POE injector. Note that the airGateway has a connector that needs to go into the POE port on the injector. You may have to press very hard or bang it on a table to get them to snap completely together; make sure the join is straight and tight all around.
- Connect the outdoor ethernet cable from the NanoStation to the POE port on the airGateway.
- You will no longer need the ethernet cable from the laptop to the airGateway.
- Connect the external antenna to the airGateway if not already connected.
- Connect power to the injector.
- After a delay while it boots up, the light on the airGateway will turn blue and you should see a hotspot with SSID www.ubnt.com (this looks like a web address but is not). If you have problems connecting, you may need to restart your computer. You will not need a password to connect. You will not have the internet yet.
- In your browser, go to the web page https://192.168.1.1, bypass any warning screens, then log in with the username ubnt and password ubnt and as before select your country, language, check the terms agreement box, and login. You should now see the setup wizard for the airGateway, but if not you will find the following on the Wireless and System tabs. Ignore any message that the CPE was not detected. First enter an administrator password in the wizard or System tab (best to use the same one as on the NanoStation). Then change the SSID and password. The SSID is the name of the hotspot WiFi network to which you will connect with all your devices. Your neighbors will see this SSID also. Use a password that you will remember but at least 8 characters and at least one capital letter and number to make it hard to guess. Click on Finish in the wizard or on Change/Apply as you did with the Nanostation. Now it will reboot.
- Find your new SSID hotspot and connect to it with your new password. On your browser go to 192.168.2.1 and log in to the NanoStation using your new password. You will need to log in like this every time you move to a new remote hotspot.
- Check that the NanoStation is now set up properly by finding a local WiFi hotspot. If you are in your RV at home, you can find your WiFi that you have in the house. Point the front of the NanoStation towards the house. WARNING: The NanoStation is very powerful. If you are in the house, never point the NanoStation directly at your router and best to keep it far from the router. If there are not any WiFi hotspots where you are, you can set up your smartphone as a hotspot if it has that capability. Then go to the Wireless tab on your laptop and click on Select. This will list all the local hotspots. If there are lots of hotspots, click on the Signal/Noise heading twice to sort so the strongest ones are at the top. Select one of them and enter the password for it at the bottom. Click on Lock to this AP, then enter the password (WPA Key) then click on Change then Apply. After a short delay while it reboots you should be on the internet. Lights on the NanoStation will show signal strength. Go to some web page on your browser to make sure it is working.
- You should keep the firmware up to date on these devices so they conform to current regulations and they are free of bugs. Log into the NanoStation at 192.168.2.1 and the airGateway at 192.168.1.1 and go to the System tab. At the top you will see how to check for updates and how to upload the update to the device and install it.
- Now you have finished configuring your CPE for WiFi as WAN. You can complete the installation by mounting the airGateway/injector combination on the wall with the bracket provided and installing your mast if you have not already done so.
You can power off the NanoStation by unplugging or by turning off your inverter, which will save battery power. I installed a power switch for the outlet I am using to make it easy to power up when needed. If you don’t have a WiFi source to connect to, you probably want to turn it off so your devices won’t connect to the the NanoStation when it has no internet connection instead of to a cell tower. When you power it back on, after booting up it will connect to the previous WiFi hotspot.
Whenever you want to connect to a different remote hotspot, you need to log in to the page https://192.168.2.1 (make this a favorite in your browser) and follow steps 19 and 20. You can do this on any device with wireless such as a smartphone, tablet, or laptop. On the wireless tab click on Select to see all the available hotspots. Select one of them, enter the password if required at the bottom, click on Change at the bottom right, then click on Apply at the top. After a delay you will be connected to the internet.
Before connecting to a remote hotspot, you should aim the front face of the NanoStation in the direction where you think the hotspot is located, such as the campground office, or the McDonalds, or the library. You should also raise it as high as possible if the hotspot is distant and out of sight. After you connect you can fine tune the direction as follows. Take your mobile device outside to the antenna mast. On the Main tab, watch the signal strength which is a negative number in dB. Closer to zero is better so -75 dB is a 10 times stronger signal than -85 dB. To some extent, the stronger the signal, the faster will be your internet connection. Rotate the antenna slowly and watch the signal strength.
To find out how good your internet connection is you can run a speed test. With your browser go to the site speedtest.net. It is also a good idea to download the free app with the same name on your smartphone. Click on BEGIN TEST. Anything above 5 Mbps is a pretty good connection.
If things go wrong anywhere in the above setup, you can reset to factory settings by pressing and holding a paperclip or pin in the small reset holes for 20 seconds on the back of the airGateway box. There is also a reset button on the System tabs. Then start over at step 1.
During a thunderstorm you should unplug the NanoStation from the POE port on the injector. This should help save both the NanoStation and the airGateway in case of a nearby lightning strike.
Finally I should comment that although this system is very good at bringing in a distant hotspot, the internet speed you will get is limited by the internet source of this hotspot and by the number of other users and by what they are doing, such as streaming movies. You will probably get the best speeds early in the morning.
Click on photos to see them large.
-- David Elmore
Like your idea, little confused on the wooden dowels, is this suppose to raise the pvc from within, what secures the dowel rod on the bottom and what is the 4 inch heavy strap for? Thanks, Randy
The dowels push up the inner tube from the bottom. Each dowel is cupped slightly at one end and pointed at the other so they lock together. You need several dowels since you have limited space at the bottom and you might not want to go all the way up. In two of the close-ups you can see a metal (copper bar) bent with a pointed hook at the bottom to hold the last dowel up. Click on the image for a large view. Let me know if you have more questions.
David
Have you tried this with xfinity wifi?
Yes, in fact we streamed video with it and it worked great. The hot spot was out of sight and did not show up on my phone.
Ok, its working, made the pvc 1 inch pipe a bit shorter but can change if desired, maybe you have error, correct me if wrong but you have in list 1.25″ cap should be 1″ cap, and special note when finding your hotspot, you must login to the Nanostation with 192.168.2.1, Wireless tab, SSID – hit select, this brings up all the available hotspots, click the top tab where its shows Signal/Noise, DBm,(this puts all db’s in order usually lowest first, if not click it again), find the one with lowest Db level and no Encryption key required unless you know the password of a given hotspot, click on circle to left, go to bottom of page, click Lock to AP. So from there you can turn your antenna by looking on your phone (a bar of intensity will appear in the Wireless tab), tablet, computer and watch for a lower Db. David, If you edit this to your blog, please erase this post. At any rate, thanks so much for this system, definitely the cheapest to put together but a very effective system. Oh and Xfinity wifi works great!
Thanks, Randall. On the cap size, note that I have 22 inches of 1.25″ pipe at the top with the top part of the 1″ pipe inside of it. So I put the cap on the end of the 1.25″ pipe. I see that the cap could have also been on the 1″ pipe so either way should work fine.
I am glad you got this to work and my design was helpful. I will incorporate your great comments.
David
Hello David and thanks for your very educational post on this. We have a small camper trailer and plan to now use it to travel, while I work from the road. I have been researching the connectivity topic over recent days. One post I came across is
http://www.technomadia.com/2014/08/how-we-keep-online-illustrated-tour-of-our-rv-mobile-internet-setup/
However, when looking at reviews of the Wifiranger Sky2 and Go2 it seems many folks don’t rate these highly due to reliability issues. Subsequent online searches led me to your post and I see you are both recommending the Ubiquity Nanostation M2 so I’ve ordered one. However, instead of the Wifiranger Go2 I’ve ordered the Ubiquity Airgateway and presume it will perform the same general function. Are you able to confirm?
Another question………..why are these folks using the additional Sky2 long range wifi antenae? What does it do that the Nanostation doesn’t?
Hi Del,
The Nanostation M2 and Airgateway will work better for you than the Sky2 and Go2, but will not be as convenient. With the Nanostation you will need to log in, search for hotspots, choose one, enter the password (it does not remember more than the previous one) then reboot it (10 seconds or so) before you can use it. I do not know much about the others, but with them it is more automatic, so if you return to a site it will automatically connect like your iPhone does. The Nanostation is designed for a fixed location. Having said that I am very happy with mine. If my very long instructions did not scare you away, you will be happy too. The antenna is built in with the Nanostation so no other antenna is needed (or even possible). Let me know if you have more questions.
David
Great post! I am kind of doing the same thing using an Asus with DD-WRT on it. Many off the self routers wont do client bridging. The difference in my setup is I connected another wifi router to the client bridge to host my own 5G/Ethernet network for all my devices. (Basically come out of the bridge into the internet port of the router) This also added natting and firewall protection. That way I can talk to my TV, NAS, and other devices internally. Most public access points block clients from being able to see each other. I plan on buying this device because it is designed for this purpose and get a bit more gain out of it.
Just FYI..I purchased one of those 18db Omni antennas that had a 6Ft. coax that connected to the router port. (Found it locally) It didn’t make any difference and it was actually worse that the small antenna that came with it. Just be ware of the crazy loss in those crappy cables that come with the antennas. Really limits the placement of the antenna as well. LMR cable is the best to use but is pricey. The Nano type of setup is the way to go.
This is a very interesting and very cool article. Instead of the airgateway, it looks like i could just repurpose an existing wireless router i have kicking around, yes?
Yes, I think you could use any router. You will have to figure out how to configure it. There will be a big advantage if it remembers all the passwords. Mine only remembers the last one.
David
Hi, yeah, that is what I was thinking. But I think I configured something wrong 😉
As a way to test just the nanoStation, without the airgateway or another router/ap, one SHOULD be able to just plug the ethernet from the nanoStation into a laptop…. and while I can see that I have connected the nanoStation to a local wifi (that I can connect to directly), the laptop doesn’t manage to get to the internet via the nanoStation yet via ethernet. Yet. So I need to sort that out before I can prove that “any router” works 😉
I guess I should say the “end of step 20” is where I am stuck when using a router/wifi ap instead of the airgateway. But I don’t think the substitution is the reason.
I’m not sure the router could remember any passwords, if by passwords you mean the SSID and passwords for wifi networks that the nanostation is logging in to. Those are only present and visible in the nanostation setup pages.
(It would be a cool piece of software to add to the nanostation! Perhaps they will add that feature to a future firmware upgrade.)
It remembers the last SSID and password you enter. By this I mean that if you set it up and have it working, then power it down and back up again (or drive away and come back) then it starts up and works the way it was before on that SSID and password.
Yes, the nanoStation remembers the last SSID and password of whatever wifi it was connecting to, no problem.
—
Update: If one is just connecting one device, via ethernet, then the nanoStation alone should work. Info from ubiquiti about how to do it: https://help.ubnt.com/hc/en-us/articles/205197710-airMAX-Configure-a-Long-range-WiFi-Client though I will admit that I haven’t gotten that working yet.
Update: I learned on the airmax boards that I should enable WDS and that got my setup working.
Thank you for this very informative post David! I’m sure a lot of people will find it helpful.
I’ve been using a Ubiquiti NanoStation M2 and AirGateway (not LR) in my truck camper for the past 7mos and I’m thrilled at how easily I have been able to maintain a fast connection to distant WiFi networks.
I wanted to comment on your note about needing 110Vac; I was initially disappointed by this limitation (I seldom have shore power and I’d prefer not to use my big inverter just to power an itty-bitty WiFi network), but Found up a compact 12Vdc POE injector and plugged it into the airGateway in place of the 110V power supply. I chose to use a cigarette lighter cord/plug, but depending upon your installation it could just as easily be hard wired. Despite the voltage difference (12 vs 24), the AirGateway and NanoStation work just fine.
What POE injector did you use? I’m looking at the listings on Amazon but am not sure which to select: https://www.amazon.com/s/?ie=UTF8&keywords=12+volt+poe+injector
The POE is included with the nanostation.
you can you use this ..hard wired to 12 volt DC supply + in-line 1 amp fuse …dont need mains electriciy
________________________________________________
iCreatin 12V Power over ethernet PoE injector and PoE splitter kit, Extension power for 12 volt 12 watt devices with 5.5×2.1 mm DC Jack
Thank you for this article. I’ve been struggling with getting a solid WiFi signal at the marina where we keep our boat and this sounds like it is the answer to our dilemma. Wish me luck !
Steven
Very cool,
As a possible enhancement…
The NanoStation will run on 12v and of you switched to a Bullet-M5 or Picostaion M2 for the inside it would also work on 12v.
We use your basic setup on low-power solar homes/campers and it works great. you just need to get POE injector with an external power input connector and feed it with the 12V.
Hi Pete how did you get on with your…. “external power input connector and feed it with the 12V”. Reason I ask is that I was not able to power up the NanoStaion M2 with a ‘bench’ 12voltDC power supply + iCreatin 12V Power over network cable PoE injector and PoE splitter kit
but the Nano does power up using the 220volt supplied PoE
I followed your directions and everything went well except I’m now at step 19/20. I was able to lock onto the hotspot and entered the password, however I cant connect to the internet. I have the yellow triangle popping up on my wifi status. I can reconnect to the wifi hotspot here in the campground but when I go back to my air gateway I cant connect to the internet. Is there something I missed?
also forgot to mention, so after I changed the mode to router and did all of the steps i went back in to change the password again, so both pages were the same. i noticed that my mode went to soho router? Any reason?
Sometimes you need to first use your browser to go to a web page like google.com then the internet provider will switch to one of their pages and may ask you to log in or to agree to terms and conditions. Once you have done this you should have access to all internet.
I am not sure what soho router is.
David
I closed my browser and opened back up, connected to my ap gateway and it says I have no internet. What do you recommend?
I googled SOHO Router. It is just an ordinary router for a small office/home office.
If no internet, I would try another hotspot. Can you make your mobile phone a hotspot for testing? Also talk to the campground staff or host. Maybe their internet is down.
internet is working fine, I am able to switch back to the campground hotspot through laptop and connect. when i select my gateway ap then i get nothing.
so I was able to connect to my cellphone hotspot, however when I connect to the campground hotspots I see the signal go up and back down on different connections. Thoughts
Check all your settings again. Unlikely, but your signal could be too strong (or weak). You can adjust the gain setting. You can also email some screenshots to me at djv at davidelmore dot com. I can compare to mine, but I probably can’t do this today.
Are the settings under the network tab supposed to be the same on the air gateway?
Nano M2: Lan network settings
Air gateway: Lan network settings
The Ip address is different and so is the range start, range end
Talked to the campground owner, they have a filter installed on the internet to not allow anyone to stream. The signal turns on and off to keep people from streaming. Would that be a reason that I cant connect? I can connect to my cellphone with no problems. Also I can connect with the wifi from my laptop but the signal isnt the greatest.
I do think you have found the problem. These devices are made to for a fixed permanent setup where you have control of the remote hotspot. They are not so user friendly for mobile use, but they can work great and have a good price. I use mainly in my children’s driveways and it always works really great for me.
Im about to use a MikroTik Passive Gigabit PoE injector adaptor to power the Ubiquiti AirGateWay WiFi Access Point connected to
12 volt Dc, so no mains electicity not sure if this will work??
Larry,
I think there is a good chance this will work and I think it is a good idea. I am using my inverter which adds a little extra power draw from my batteries.
Hi Larry,
Did the MikroTik Passive Gigabit PoE injector adaptor work for you?
David, just a quick THANK YOU!!! After spending several hours “chatting” with Ubiquiti and getting nowhere, I found this post.
Your discription and instructions were extremly helpful. I am now watching “Netflix” in the comfort of my boat. I am going to get back with Ubiquiti and inform them of this instructional. I think it could be very helpful in demistifing the process. Thank you again, Tom
P.S. is was great to understand what the NanoStation and the AirGateway are doing in this setup and why they need to be setup in this manner. The folks at Ubiquiti didn’t really understand what we were trying to do.
Tom, you are very welcome! I have been streaming video (from my Slingbox at home on DirecTV) when parking at Walmarts for the night.
If you feel you owe me something, please order a print from my website Redipix.com (see upper right of this page). You will be very happy with the quality and service. We sell “Wall-peel” prints that stick to the panels inside your boat.
David
David what is the furthest AP you have connected to.
100ft – 1,000ft etc. Nice tutorial.
Probably about 2000 ft. Clear line of sight is more important than distance. Some APs will limit the distance (based on the round-trip time the signal takes). An AP inside a building is not as good as one with a roof antenna or one near a window. So you need to be lucky to get one as far as 2000 ft or longer. Boaters often talk about several miles over water to an AP on shore.
David
Thanks David, I live in a Mobile Home Village with about 100 homes maybe 1000 ft from entrance to back room of homes.
On just my laptop I can receive signals from about 400 ft away.
David,
Thanks so much for this post. I followed your steps exactly and have a NanoStation LocoM2 connected to an airGateway LR. They are working flawlessly and I am commenting here on your site using their connection to the internet! I have done some initial distance testing around the property and am amazed so far. The pair will be permanently mounted in our travel trailer.
Blessings and take care,
Kevin
Thank you for this very helpful post. I have bought the gear and am setting it all up. My mast setup will be custom for my unit – I don’t have a ladder and my roof is not walkable. So I will likely use a “Flagpole holder” in my trailer hitch and some sort of standoff for support. I’m still sorting out some details. As for the electronic setup — your instructions were easy to follow and it all seems to be working very well.
Thank you for your very useful post.
Larry on Jan 11 2017 posted a super interesting idea to use a 12v adapter so you don’t have to waste tons of battery power on an inverter when shore power is not available.
But I am not able to figure out which things to replace and how to set it up.
Has anyone done this and can share the steps?
Nathan, These links should help:
https://www.amazon.com/Alfa-APOE03-Redundancy-Industrial-Adapter/dp/B005HIS408/ref=pd_sim_pc_2
and
http://www.cruisersforum.com/forums/f13/12-volt-poe-injector-for-ubiquiti-bullet-116015.html
Let me know if you have more questions.
David
Thanks!
Questions:
There are two pieces to the AirGateway.
One is the 110v power connection.
The other is the router/antenna.
I assume I replace the 110v piece with the Alfa?
Do I connect the PPOE Ethernet connection on the Alpha to the data input on the AirGateway?
Nathan, yes to both questions. Please report back here when you have it working. -David
How do you deal with captive portals?
Usually after connecting I go to a browser on my laptop or mobile device and request some web page then the captive one shows up where I can accept the terms etc and proceed to other web pages. I find I need to do this on just one device after which I can collect email and browse on all devices. Let us know if it works differently for you.
David
Thanks David. I will try that.
Nick
Good night David! Help! thank you for providing the step by step, we changed the settings to what you had in your screenshot in the Network setup. And it kick us out and then we couldn’t even access to the screen settings anymore…any idea of what happened? It looks like it is locked us out and now we can’t access… Help! Please. Thank you
Do you need to log back in? Hard to help you without more details. Maybe you need to go back to the beginning and compare each screen with my screenshot images.
David
Hi David, what about some hotspot with a web page login, do you have some idea on this? I use in the pass a old hawking HW2R1 but be limited with this kind of hotspot that was more popular, like the one at McDonald. I like your setup, probably today the M5 version should be a little bit better but again try to find a solution for those one that offer a login page and limited you to some like 1 or 2 devices!
Steve, it is important to note that the M5 will only work with networks using the 5GHz spectrum (802.11ac networks). The M2 on 2.4GHz will be able to connect more places, since a place offering 5GHz will also have 2.4GHz service. The reverse is often not true.
Hi there,
This subject has been sort of touched on but wanted to be clear. Our situation is that in a couple of campgrounds we visit on a regular basis have multiple access points broadcasting the “Guest” wifi signal however when you select it you are directed to a web browser page to select either day or multiple day paid access or 1 hour free. I generally just take the free hour as all I need to do is check email and messages. It does however require you to log back in and make your selection each time you want internet access. In your opinion would this hardware setup work for that scenario?
Thanks,
Dean
Dean,
I have had that kind of situation with my NanoStation setup so I would say yes it should work. We now have unlimited AT&T cell data with a large cell booster and so don’t use the Wi-Fi setup much any more.
David
David,
Thanks for the reply. Out of curiosity what are you using as your cell booster? Unfortunately the parks we frequent have little to no cell service unless you are in a specific spot which we never are.
Thanks,
Dean
Dean,
We have weBoost Drive 4G-M Cell Phone Booster Kit and are pleased with it, but I am sure there are new models now. More information on our equipment here: https://davidelmore.com/Equipment.php
David
Good Morning David,
I have a question regarding ” Click on Lock to this AP, then enter the password (WPA Key) then click on Change then Apply” in Step 20. I haven’t tried it but if you click on “Lock to this AP”, do you HAVE to enter a password if one isn’t required? If you recall In our situation a password is not required as you are directed to a browser page to select either FREE 1 hour usage or a selection of different PAID usage options.
Thanks,
Dean
Dean, you are correct that if no password is required, then you will not see the password entry box.
David
I have bought a used UAP-AC-LR at a very good price. Can the Ubiquity AirGateway be replaced with Ubiquiti UniFi UAP AC Long Range (UAP-AC-LR)?
John, I know nothing about UAP-AC-LR
David
David,
Just an FYI but the WIFI setup is working like a charm. I mounted the Nano on a 6′ piece of 1″ Grey Electrical PVC and mounted the PVC on my batwing roof antenna on our RV. I can raise/lower and pan 360 degrees from inside the RV. I am going to put in an A/B ethernet switch where A goes to the router for normal operation and B goes to my laptop for the signal selection part of the initial setup.
Thanks for sharing.
Dean
I just found your post after chasing lots of ideas to boost the signal here for a couple of months. GREAT STUFF!
Just wanted to thank you for the ideas. I guess the downfall is really just having to reset the SSID from a PC with every new location … but, many spots work well so I wouldn’t deploy the booster unless I needed to.
Is it still working for you nearly 5 years later?
Thanks again.
Hi Chris,
Yes, our repeater is still working great. I recently set up one to go to my barn from the house and it works great too. After you do the setup at a new location a few times it goes really quick.
David
I bought this setup several years ago based on this write up. My only issue is remembering how to set it up when we arrive at a new campground with WIFI as most of the places we camp doesn’t have WIFI at all.
But, I will say, when we do get a signal, this setup works and handles 6 or so people interacting with the internet at the same time.
Great setup! Happy Camping!
Is there maybe an updated way to do the initial nanostation configuration wirelessly ( like with an iPad or iPhone) instead of me having to tote my laptop in my RV (which I typically don’t bring on trips in our RV)?
You need the laptop just once so you can use Windows and an ethernet cable. After that the iPhone will work just fine.